Fall is in the air. It is so nice to feel that autumn is here. The nights are cooler and the air is so fresh without the heat of summer. I really enjoyed yesterday with the overcast clouds. It reminds of of those wonderful years I spent in Gig Harbor on the Puget Sound. I love the rain.
I am still working on my knitted afghan and I finished my moebius scarf but I ran out of time and energy to show the picture of it. So, instead
here is a quick, fun project that you can do. It's knitted stars and
they are so much fun to make. They are made on DPN (double pointed
needles) and you can use sports weight or DK weight yarn. You only need
a little amount so it's a good project to use up odds and ends.
Stars
are popular at Christmas time but you can also use them anytime of the
year in different color schemes. Here is the pattern:
Supplies:
1 set DPN size 3
small ball of sport weight or DK weight yarn
darning needle
And the finished product!
I
hope you enjoy this project.
Now for my invitation to you. I will be in England the latter part of October. I am so excited for this trip. My daughter is taking me on a three week journey through England and France. We will be staying with some dear family friends while in England. I know I have a lot of blog friends in the UK, so, if you are close to the West Midlands (Bromsgrove, Rubery, etc), I would love to meet you for coffee. My treat! Just comment or e-mail me.
There's lots of more news about this adventure that I can share with you at a later time.
I hope you each have a great week and I would love to hear from you if you have the time.
blessings to all of you,
Pat
P.S. Remember to check out Handmade Harbour for some great craft ideas!
Saturday, September 21, 2013
Saturday, September 14, 2013
Vintage Style Lacey Crochet Baby Blanket
Greetings everyone. I hope each of you had a great week. Our weather has returned to normal and the evenings are once again cool and pleasant.
This week I will share with you a baby blanket I have been working on for the past 10 days. It has been so much fun that I couldn't put it down once I started on it.
As you may recall, I crochet and knit with a group that makes items for charity. We recently received a large donation of yarn and there was two new packages (with 10 skeins each) of this yarn. I took one of the packages and my friend took the other.
As you can see, this is a woven ribbon type yarn. I didn't know how it would knit up but it was great to work with.
I wanted to find a crochet pattern that wouldn't be boring to do and yet not too complicated. I looked online and through my stash of old patterns. I found this pattern tucked away in my pattern stash. I've had it for almost 30 years and thought it would be a fun pattern to crochet.

Here's the finished product. I think it came out cute although someone has already asked me "how will a baby use a round blanket". Well, that's up to the Mom - I just had fun making it!
Before I end this post, I want to share with you my great "find" of the week. I stopped by my local World Market; I love that store with all the goodies they offer from around the world. They had some of their African items on sale and I purchased this basket for 1/2 price for a total of $19.99! I had wanted one for a long time and it will be perfect for my large knitting projects like the afghan I am currently working on.
I would love to hear about what you are working on. Also, feel free to e-mail me if you would like a copy of this pattern. Please come back again and visit Lilly My Cat and stop over at Handmade Harbour for some great crafting ideas and also check out this blog for additional creative gifts.
take care,
Pat
This week I will share with you a baby blanket I have been working on for the past 10 days. It has been so much fun that I couldn't put it down once I started on it.
As you may recall, I crochet and knit with a group that makes items for charity. We recently received a large donation of yarn and there was two new packages (with 10 skeins each) of this yarn. I took one of the packages and my friend took the other.
As you can see, this is a woven ribbon type yarn. I didn't know how it would knit up but it was great to work with.
I wanted to find a crochet pattern that wouldn't be boring to do and yet not too complicated. I looked online and through my stash of old patterns. I found this pattern tucked away in my pattern stash. I've had it for almost 30 years and thought it would be a fun pattern to crochet.

Here's the finished product. I think it came out cute although someone has already asked me "how will a baby use a round blanket". Well, that's up to the Mom - I just had fun making it!
Before I end this post, I want to share with you my great "find" of the week. I stopped by my local World Market; I love that store with all the goodies they offer from around the world. They had some of their African items on sale and I purchased this basket for 1/2 price for a total of $19.99! I had wanted one for a long time and it will be perfect for my large knitting projects like the afghan I am currently working on.
I would love to hear about what you are working on. Also, feel free to e-mail me if you would like a copy of this pattern. Please come back again and visit Lilly My Cat and stop over at Handmade Harbour for some great crafting ideas and also check out this blog for additional creative gifts.
take care,
Pat
Sunday, September 8, 2013
Recipe for Homemade Vinaigrette
Wow! It has been so hot here in Southern California that I can hardly wait until this heat wave disappears! It's the humidity that's the worst and it doesn't cool off in the evenings. The weatherman says it's suppose to return to normal next week. And, to think it's September!
I have been busy working on numerous projects but none are finished to share with you yet. I thought you might like this easy recipe for homemade vinaigrette. I like to make this ahead of time and it keeps for a couple of weeks in the frig. It's easy, inexpensive and I think it tastes better than those store bought ones that you pay a lot of money for.
Here's what you will need:
* Oil - I use grape seed oil but use the oil of your choice
* Assorted vinegars - balsamic, red wine, rice wine vinegar, etc
* Salt and pepper
* Fresh garlic
* Tarragon
* Dijon mustard
Have fun experimenting with different oil and vinegars.
I have been busy working on numerous projects but none are finished to share with you yet. I thought you might like this easy recipe for homemade vinaigrette. I like to make this ahead of time and it keeps for a couple of weeks in the frig. It's easy, inexpensive and I think it tastes better than those store bought ones that you pay a lot of money for.
Here's what you will need:
* Assorted vinegars - balsamic, red wine, rice wine vinegar, etc
* Salt and pepper
* Fresh garlic
* Tarragon
* Dijon mustard
Shahnaz's Vinaigrette
In glass container, press two cloves of garlic. Add in1/3 cup of seasoned rice vinegar and 1/3 cup of red wine vinegar. Add in 1/2 cup of oil and 1/2 teaspoon of each black pepper and salt. Last, add in 1 teaspoon of crushed dried tarragon. Stir well and let sit one hour before using or refrigerating.
Dijon Vinaigrette
In a glass container, crush one clove of fresh garlic, add in 1 teaspoon of dijon mustard, 1/4 teaspoon of salt, 1/4 teaspoon of pepper, 4 ounces of balsamic vinegar (I used white balsamic) and 4 ounces of oil. Stir well and let sit about one hour before using or putting in refrigerator.
The fresh garlic adds a unique flavor to the vinaigrette without overpowering the taste.
After living here in Southern California and shopping at the Persian markets, I have discovered this wonderful grape seed oil. I now use grape seed oil for all my recipes that use oil. I found this wonderful white balsamic vinegar at my local Trader Joe's store.
I hope you have fun experimenting with these recipes. As long as you keep the oil to vinegar measurements, you can mix up the vinegars and the seasonings.
Until next time, have a wonderful week. And, please stop by Handmade Harbour and check out their Handmade Monday post to see some great craft ideas.
Take care,
Pat :)
Saturday, August 31, 2013
Felt Hearts and Hand Warmers
It's time again for a new post so I hope you will like what I have to share with you today.
I am sitting here at my laptop trying to stay cool. As you know, I live in Southern California. We usually have mild weather, but this week we have had a heat wave with high humidity that just doesn't want to go away! The last couple of nights we have had to sleep with the air conditioner on and now I find my joints are hurting - especially my knees. Does that mean I am getting old?
This past week I have been busy completing the craft projects for my Norwegian group which will be having a bazaar. I shared with you the pattern for the Nisseman and the crocheted roses. Here's some felt hearts I also made for the bazaar:
I used the left over felt I had from the nisseman project. Originally I wanted to decorate the hearts with a piece of woven ribbon. But, I couldn't find my sewing basket! I looked and looked, climbed up to the shelves in the garage and looked through numerous boxes to no avail. Since I moved here three years ago, there are some items I have no idea where they are!
Anyway, I decided to use my fabric paint and paint the designs on the felt. I let the paint dry and them I stitched them together with crochet thread. They are filled inside with pillow filling.
The pattern can be found at mrsbrownmakes. It's a Kat Goldin design. If you have the time, please visit her lovely blog. She has some wonderful ideas and patterns. I am going to keep these for myself since I think they will be great when I travel to England this fall.
I would love to hear from you and share what project you are working on. Please feel free to comment below. And, don't forget to visit Handmade Harbour where you will find some great ideas for crafts.
Enjoy the long weekend and I will be back again next week!
regards,
Pat
I am sitting here at my laptop trying to stay cool. As you know, I live in Southern California. We usually have mild weather, but this week we have had a heat wave with high humidity that just doesn't want to go away! The last couple of nights we have had to sleep with the air conditioner on and now I find my joints are hurting - especially my knees. Does that mean I am getting old?
This past week I have been busy completing the craft projects for my Norwegian group which will be having a bazaar. I shared with you the pattern for the Nisseman and the crocheted roses. Here's some felt hearts I also made for the bazaar:
I used the left over felt I had from the nisseman project. Originally I wanted to decorate the hearts with a piece of woven ribbon. But, I couldn't find my sewing basket! I looked and looked, climbed up to the shelves in the garage and looked through numerous boxes to no avail. Since I moved here three years ago, there are some items I have no idea where they are!
Anyway, I decided to use my fabric paint and paint the designs on the felt. I let the paint dry and them I stitched them together with crochet thread. They are filled inside with pillow filling.
This was suppose to be a wreath design with green dots making the wreath. It didn't work so I was going to throw it away and after I had put the heart together, I opened it up and saw that it make a perfect wreath design!
I had so much fun making these little hearts that I made a batch to sell on my etsy store:
This past week I have also had time to make a pair of hand warmers. I had the yarn in my stash and it worked out great.
I would love to hear from you and share what project you are working on. Please feel free to comment below. And, don't forget to visit Handmade Harbour where you will find some great ideas for crafts.
Enjoy the long weekend and I will be back again next week!
regards,
Pat
Sunday, August 25, 2013
Vegetarian Mousakka Recipe
Hello everyone. I had wanted to share this recipe with you last week but I ran out of time. I enjoy vegetarian food and I also enjoy making up new recipes that are vegetarian. With so many soy products out there today, it's really quite easy to be creative.
So, here is the recipe I promised to post for Vegetarian Mousakka. You will need the following:
****************************************************
2 medium size eggplants
2 to 3 medium potatoes
1 16 ounce can kidney beans, or pinto beans, or beans of your choice, drained
1 large onion, chopped
1/2 to 1 cup sliced mushroms (you can use canned or fresh)
2 Tablespoons fresh chopped parsley
2 Tablespoons tomato paste
salt & pepper
1/4 tsp cinnamon
oil
For Bechamel sauce:
1/3 cup margarine
1/2 cup flour
2 cups + unsweetened soy milk
salt and pepper
dash nutmeg
shredded soy cheese for topping
*****************************************************
First you will need to peel the eggplant, slice it approximately 1/4" thickness and place in a colander. You can salt each layer of eggplant and let it sit in the colander for a couple of hours until you see liquid in the plate.
Take a large baking sheet and line it with foil paper. Pour a little oil in a plate and dip each side of the eggplant in the oil and place on foil. (You can brush each eggplant slice if you want to do that instead) Fill tray with eggplant slices and broil under the broiler until eggplant becomes golden brown. Turn each slice over and broil other side.
So, here is the recipe I promised to post for Vegetarian Mousakka. You will need the following:
****************************************************
2 medium size eggplants
2 to 3 medium potatoes
1 16 ounce can kidney beans, or pinto beans, or beans of your choice, drained
1 large onion, chopped
1/2 to 1 cup sliced mushroms (you can use canned or fresh)
2 Tablespoons fresh chopped parsley
2 Tablespoons tomato paste
salt & pepper
1/4 tsp cinnamon
oil
For Bechamel sauce:
1/3 cup margarine
1/2 cup flour
2 cups + unsweetened soy milk
salt and pepper
dash nutmeg
shredded soy cheese for topping
*****************************************************
First you will need to peel the eggplant, slice it approximately 1/4" thickness and place in a colander. You can salt each layer of eggplant and let it sit in the colander for a couple of hours until you see liquid in the plate.
Take a large baking sheet and line it with foil paper. Pour a little oil in a plate and dip each side of the eggplant in the oil and place on foil. (You can brush each eggplant slice if you want to do that instead) Fill tray with eggplant slices and broil under the broiler until eggplant becomes golden brown. Turn each slice over and broil other side.
Here's a picture of the broiled eggplant. Now it's time to make the filling. Take the chopped onion and saute in a nonstick pan in a little oil. Saute until golden brown. Add in the can of beans (drained), mushrooms, 2 Tablespoons of tomato paste and cinnamon. Add a little water (1/4 cup or so) if needed. Bring to a boil and lower heat and simmer for about 5 to 7 minutes. You can adjust the seasoning by adding salt and pepper if needed. Remove from heat and lastly, add in chopped parsley.
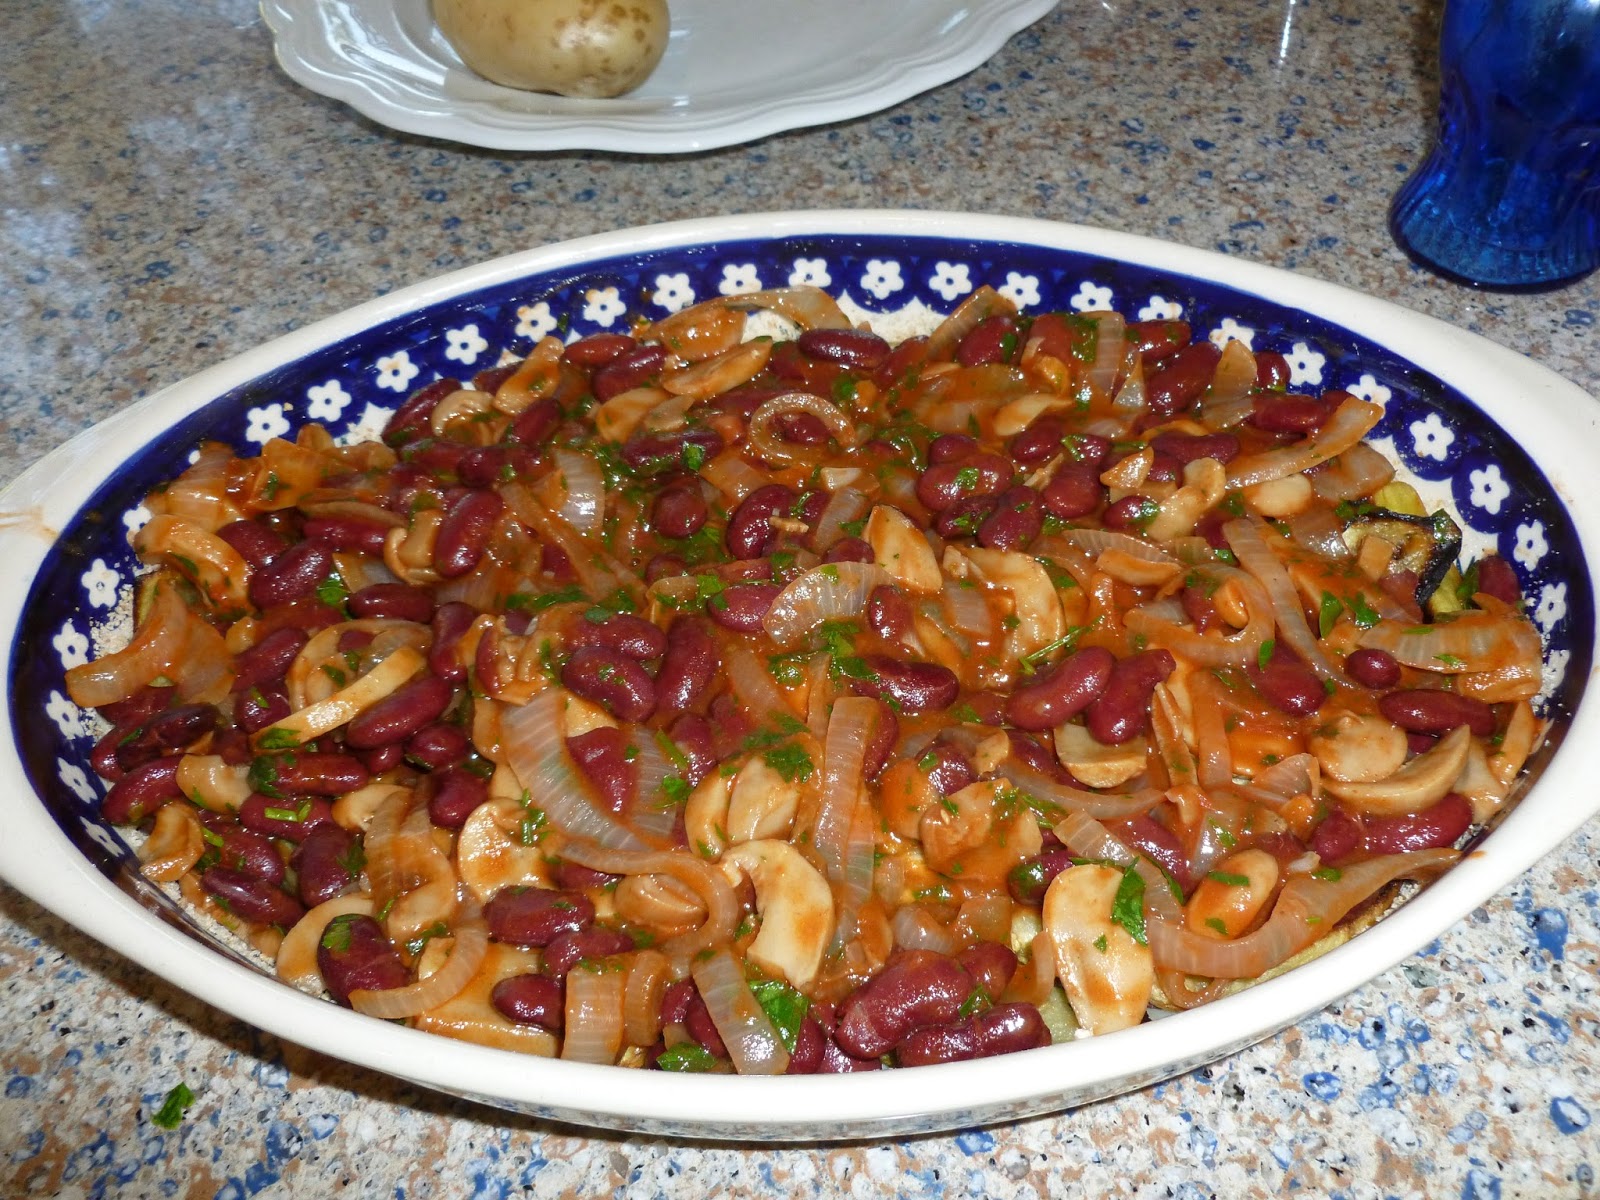
Here's a picture of the cooked filling. It shouldn't be dry but it shouldn't be watery either. It should have a little bit of thick sauce. Now it's time to layer the casserole together.
Take a medium sized oven proof baking dish and grease it well and sprinkle with breadcrumbs.
Take the potatoes (you can keep the skins on them if you wish) and microwave them until they are tender. I like to precook them this way so that they will be thoroughly cooked in the casserole. After precooking them, slice them in thin slices.
Take the potato slices and layer the bottom of the casserole dish with them. Only do one layer of the slices. Sprinkle with salt and pepper.
Add a layer of the broiled eggplant slices on top of the potato slices.
Place all of the filling mixture on top of the eggplant layer and spread evenly.
Add another layer of potatoe slices on top of the filling. Sprinkle potato slices with a little salt and pepper.
Add the last layer of eggplant slices on top of the potato slices.
Now it's time to make the bechamel sauce. Classic bechamel sauce is made with milk and butter with beaten eggs added in last for richness. This is a vegan style sauce but it is very tasty. Be sure to use "unsweetened" soy milk.
Take a medium sauce pan and melt the butter in it. Add in flour and whisk flour into the melted better. Gradually add in soy milk, stirring constantly so that you won't get any lumps. Continue stirring and adding in a little milk as needed until mixture begins to bubble and mixture is medium thick. Add in salt and pepper to taste along with a dash of nutmeg.
Remove sauce from heat and pour sauce over the top of the eggplant slices. Spread sauce to edge of casserole dish. Sprinkle top with grated soy cheese if desired.
Bake casserole in preheated 365 degree oven for approximately 40 minutes or until it starts to bubble around the edges. Remove from oven and let cool 5 to 10 minutes and serve with plain rice if desired.
You can adjust this recipe to your liking. You can use less potatoes and more eggplants or add your favorite item to the filling.
I hope you will enjoy this recipe. It's tasty and the bechamel sauce makes it creamy.
Be sure to stop by Handmade Harbour where you will find some wonderful creative ideas!
Have a great week.
Pat :)
Sunday, August 18, 2013
Crocheted Roses
Hello everyone. I hope each of you are doing well and enjoyed your weekend. I want to thank everyone who visited this blog last week during the blog stop tour. It was fun seeing the number of visitors who visited. I hope you will continue to read Lilly My Cat.
I didn't know what to share this week. I made a vegetarian mousakka a couple of days ago and was going to share the recipe but since I am so behind in writing this post, I thought it would be easier to write up this idea for crocheted roses.
My friend recently bought some crocheted roses that you can display in a vase. I liked the concept but the actual roses looked a bit old fashioned for my taste (my daughter will tell me, "what taste"!) Anyway, I found a fun little pattern that gives some depth to the rose so here's what I came up with:
If you would like to make some of these roses, here's the link to the pattern. I hope you have as much fun making them as I did!
Have a wonderful week and please remember to stop by Handmade Monday and see some great ideas from other crafters.
Wishing you the best,
Pat :)
(Lilly's Mom)
I didn't know what to share this week. I made a vegetarian mousakka a couple of days ago and was going to share the recipe but since I am so behind in writing this post, I thought it would be easier to write up this idea for crocheted roses.
My friend recently bought some crocheted roses that you can display in a vase. I liked the concept but the actual roses looked a bit old fashioned for my taste (my daughter will tell me, "what taste"!) Anyway, I found a fun little pattern that gives some depth to the rose so here's what I came up with:
I had so much fun making these, that I got carried away with the pattern and made 12 of them!
The colors may be a bit bright since I used leftover yarns that I had in my yarn basket. I like the black/white or gray/white ones since they look a bit more modern.
I sewed a pin on the back of each rose so that you can pin it on a hat, or coat, etc.
If you would like to make some of these roses, here's the link to the pattern. I hope you have as much fun making them as I did!
Have a wonderful week and please remember to stop by Handmade Monday and see some great ideas from other crafters.
Wishing you the best,
Pat :)
(Lilly's Mom)
Sunday, August 11, 2013
Make an Elf on the Shelf or Scandinavian Nisseman
The holidays are fast approaching and there's still plenty of time to create something fun! Here's a repost that I originally posted August of last year. But, it's very Scandinavian and it's very Christmasy. So, if you haven't seen it before, here's the instructions for making a Scandinavian Nisseman (or Elf on the Shelf!).
Here's a closeup of how the pieces are placed together prior to sewing the seams. As you can see, the bottom of the face piece is tucked under the front neck edge.
Here is what you will need to make one nisseman:
2 pieces of red felt (12" x 10")
1 small piece of blue felt (12" in length)
1 small piece of ivory felt
small amount of ivory or pale yellow yarn
small amount of ribbon
small amount of brown, white and red embroidery thread
small amount of quilt batting
red sewing thread and needle
The first thing you will need to do is to get the pattern. Please right click on these two images and "save image as" to your computer. Then you can go back and print the image from where you saved it on your computer.
Take the pattern and cut out 1 back, 1 front and 1 hat using the red felt. Cut 1 face using the ivory felt. Also cut 1 back out of the quilt batting. I only used half of the thickness of the batting and cut it a little smaller than the body since you don't want the edges of the batting to showing in the seams.
Draw the face pattern on the piece or ivory felt and embroidery the face. Here's a close up of the face:
After you have embroidered the face, you will need to assemble the Nisseman to sew the seams together. Place the back piece on a flat surface, place quilt batting on top, place front on top of batting, place face on front of batting, tucking the neck of the face under the front piece, and lastly, place hat on batting and over the forehead of the face. Pin pieces together.
At this point you can base the pieces together if it's easier for you. Otherwise, if the pins don't bother you, then you are ready to stitch the Nisseman together using a needle with red sewing thread.
Here's another picture showing the different layers of the felt, batting, and face. Stitch around the outside of the piece using the red thread.
Please do not stitch across the neck area or across the bottom of the hat. We need to attached the braids. Take the yarn and make a 3 yarn braid. Take the braid and place it across the top of the face. Tuck a little bit of the braid on each side of the hat. Here's a close up of what I mean:
With your red thread, start at the lower side of of the face and attach the back of the braid to the body. Continue to stitch across the top of the hat, making sure you pick up a little bit of the braid in each stitch and finish attaching the braid on the other side of the face. Lastly, stitch across the neck area. You may have some red stitches showing on either side of the face on the back side - that's OK. But, please do not have stitches showing through to the other side when you stitch across the top of the face and neck.
Here's another close up of the face and stitching:
You can tie some colored ribbon on each ends of the braid. And tie the blue felt scarf around the neck.
And, you now have a lovely little Nisseman to decorate your holiday decor. If you wish, you can tie a ribbon on top of his hat so that you can hang it from your tree.
I hope you have enjoyed this little tutorial. And, I hope you have enjoyed visiting Lilly My Cat. If you like, you can sign up to receive future posts and visit again.
With my best wishes,
Pat :)
Subscribe to:
Posts (Atom)