Saturday, July 27, 2013

Recipe for Egyptian Kabab Hala

Hello everyone.  Lilly thanks you for all your comments and reading her blog post last week.  I hope you have had a good week?  I thought I was going to share with you a new crochet pattern that I had discovered.  I wanted to crochet an afghan for my daughter and ordered the yarn from England to make it.  Well, after crocheting almost the complete 400 gram skein, I found out that the pattern wasn't going to work.  So, I unraveled it and now I am knitting an afghan for her.  I don't know when I will ever learn to stay away from bad patterns!!

I could easily be a vegetarian but now and then I do like very "lean" beef like filet mignon or boneless chicken breast.  My husband is the complete opposite.  He wants the bones in his chicken or meat.  Anyway, "we" went grocery shopping at my favorite Persian market yesterday and they had lovely "boneless" beef stew meat on sale.  I thought of this recipe and bought some to make it.  So, here's a recipe I want to share with you for Egyptian Kabab Hala.  It's basically a wonderful beef dish that is slow cooked and makes it's own gravy.  Here is what you will need:


2 pounds lean beef stew meat cut in 1" cubes
1 large onion - chopped fine
2+ cloves of garlic - minced
2 T flour
1 beef buillion cube dissolved in 2 cups boiling water
salt and pepper
1/4 cup butter
dash cinnamon - optional

Wash, cut and dry meat cubes.  Salt and pepper the meat (take it easy on the salt as the buillion has salt in it) and sprinkle meat cubes with the flour.  In large pot (I use non stick) melt 2 Tablespoons of the butter.


When butter is melted, add half of the floured beef cubes.


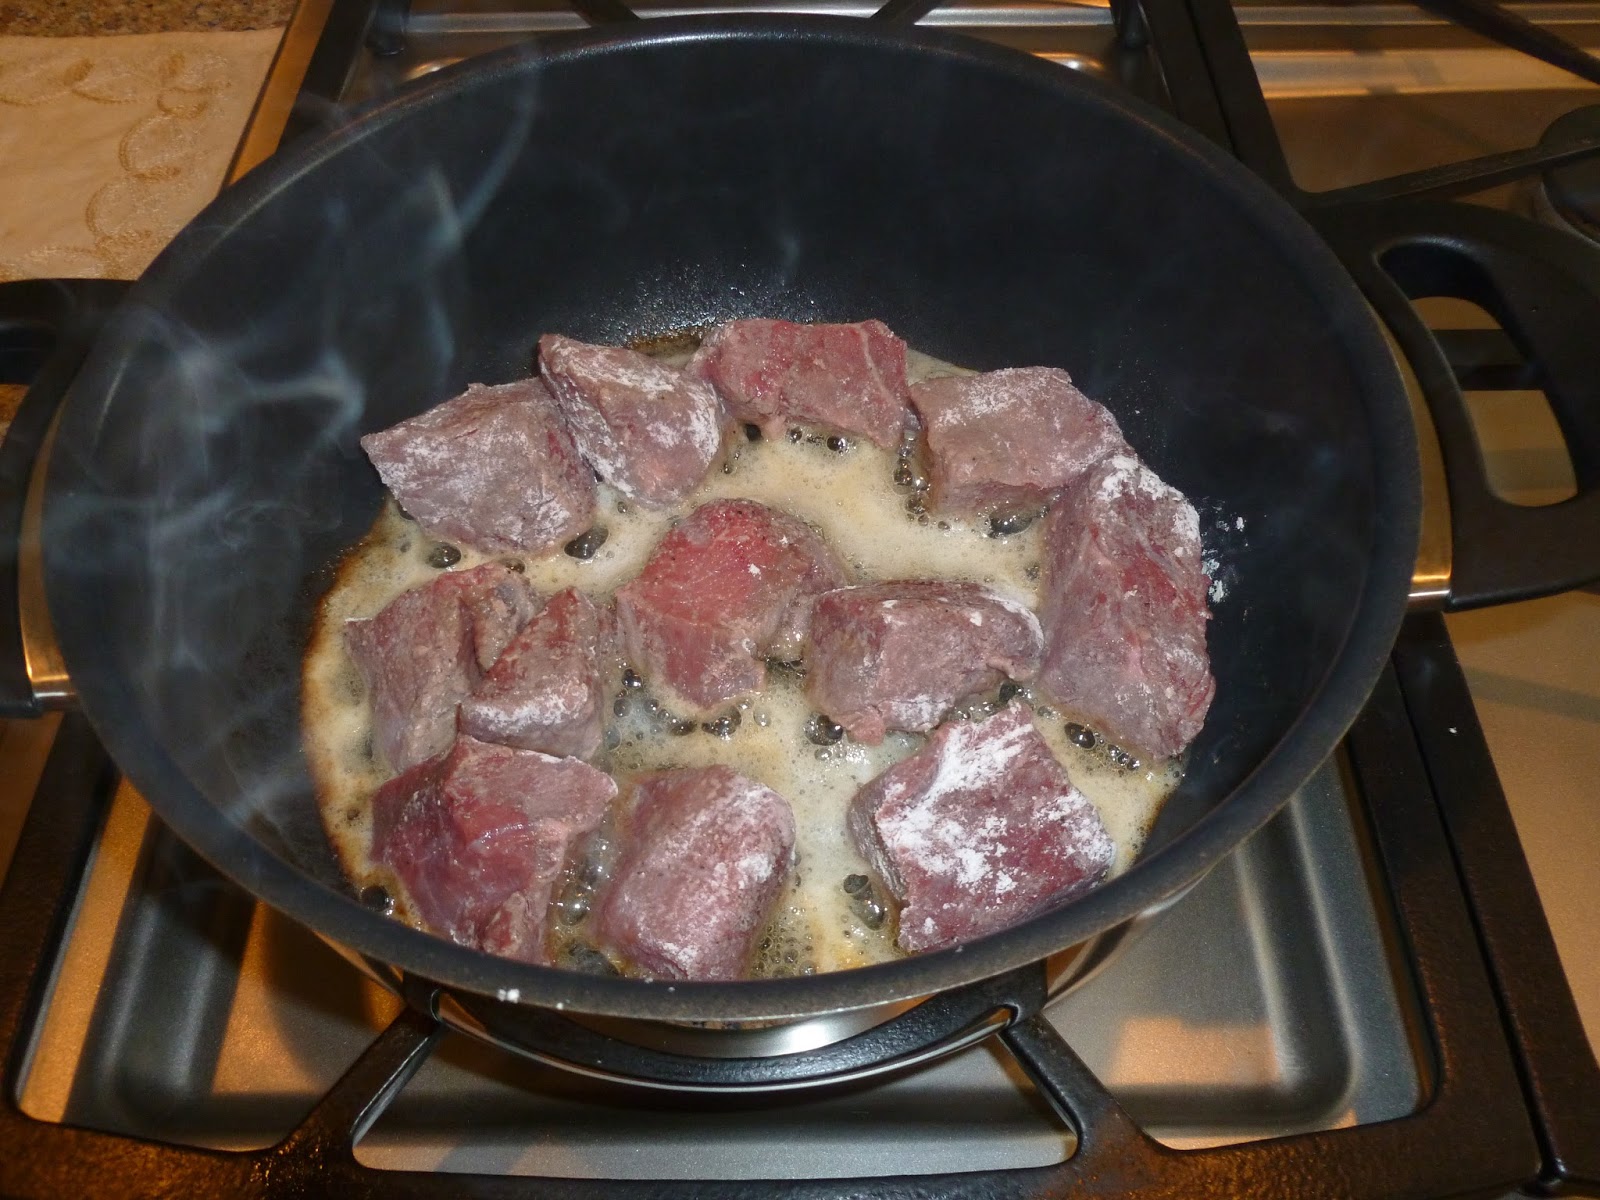
Cook beef cubes until nicely browned on all sides and remove from pan and put in slow cooker.  Repeat for second half of beef cubes using the remaining 2 tablespoons of butter.


After browning the beef cubes, they should like the picture above.  When all cubes have been browned and put in the slow cooker, you will brown the onions, followed by the garlic in the leftover butter.


Cook the onioins for about three to four minutes and add in the garlic at the last.  Cook just until colored and onions have absorbed the juices from the pan.  Place onions on top of the browned beef cubes in the slow cooker.


Turn the slow cooker onto the "high" heat setting and cook for one hour.  After one hour, turn setting to "low" and add a little bit of the beef buillion - approximately 1/2 cup to 1 cup.


 Continue to cook on low for approximately five to six hours, stirring frequently and adding a little more buillion if needed.  As the dish cooks the onions and juices with combine with the flour and make a wonderful gravy for the meat.  But, you need to be patient as this takes a long time to simmer.  You can add a dash of cinnamon (1/4 teaspoon) if you wish a little more flavor.


Here's a  picture of the finished dish.  It's a great meal served with a side of rice and a chopped salad.


The meat is fork tender and the flavors are wonderful.  I usually serve this dish with a side of rice and fresh green salad.


Note:  If you don't have a slow cooker,  you can cook it on top of the stove in a covered pan.  But, in that case you may need to use the whole 2 cups of the broth.  I have a gas stove and it cooks very hot.  I only used a little over 1 cup of the broth using my slow cooker.   Just add enough broth to keep the sauce "gravy" consistency.  I hope this helps.  Any questions, please comment and I will respond. 


I wish each of you a fun filled week.  I hope to be back next week with something new to share with you.  Please remember to stop by  Handmade Harbour where you will find lots of creative ideas.  Until next week,
take care,

Pat & Lilly :)

Sunday, July 21, 2013

Blog Tour and Painting and Vino written by me, Lilly!

Hi everyone!  It's me, Lilly, writing to you today.  My Mom decided to take the week off so I thought I would let you know what's been going on around here.

 
My Mom  is so excited about this blog tour she signed up for.  It's called Creative Crafting Blog Tour and it's a great opportunity to show off your blog.  If you want more information, here's the link.  Lilly My Cat will be featured on this blog tour on August 12th!

So, if you want to know what I've been up to this week here's a rundown of my daily schedule:

8:00 AM   Eat breakfast
9:00 AM   Take a walk outside around the pool and check for geckos
10:00 AM  Start meowing for lunch
11:00 AM  Eat lunch
12:00 Noon Take a cat nap in the living room where's it sunny (I love the sun....)
3:00 PM   Start meowing for dinner.  This is the time where I can get real restless and jump on my Mom's computer, sit in her file basket, or my favorite spot is to lay on the dining room table and wait and listen for my automatic feeder to go off!
4:00 PM   Eat dinner!  Finally my dinner appears in my automatic feeder and I am in heaven

The rest of the day is spent watching a bit of TV, sitting next to my Dad in his chair, sitting with my Mom while she is working with her yarn, lying on my back taking cat naps and enjoying life.

By 11:00 PM it's time for me to go to bed and again I am anxious since I get a little cat snack before bed (which consists of a few kernals of dry cat food).  It's time for a good night's rest before the next day begins.

As you can see, basically I just eat and sleep but don't you think I have a great life?  And, best of all, I have great parents who love and pamper me.

My sister, Heidi, took my Mom to an evening of Painting and Vino this week in Laguna Beach.  They had a great time painting and drinking fine wine.


They painted Monet's Sunet in Venice.  It was held at Rock n' Fish restaurant in Laguna Beach and all supplies were included.  Look at them in their painter's aprons!


Here's a photo of their masterpieces they created that night.  After the class ended, they walked down the street to Peppertree Lane.


It's a quaint little alley like walkway off the main street of Laguna Beach.  They popped into an amazing chocolate shop and bought some wonderful, handmade chocolates.


Mom said she felt like she was in Paris as the shop was  so unique.  Too bad I couldn't have gone but I stayed home and kept my Dad company.

That's about all I can think of for this posting.  Please stop by Handmade Harbour and see some great creative ideas.

With my love and meows,
Lilly


Sunday, July 14, 2013

Crochet Ripple Baby Sweater with Vintage Pattern

Hello my friends.  I hope you have had a great week and that you had a chance to enjoy your weekend.  It's been a fun week here at Lilly My Cat.  I hosted a craft day this past Thursday at my home, went to a birthday party on Friday and had people over for dinner on Saturday.  It's nice to have friends and family.

I mentioned in my post last week that I would share with you my latest finished creation.  It's a crocheted baby sweater from a vintage pattern dated 1950 (before I was born)!


As you can see, it's made up of 14 ripple panels; three for each sleeve, four for the back and two for each front.  The instructions were not so clear and originally I ended up with 13 panels and had to unravel all my work!  But, it was OK since according to my children, "what do I do with all my time"!


I used just over two skeins of Rowan cotton glace' yarn.  Now, here's where the problems occurs - the pattern is written for 3 ply baby yarn.  I think it would be equivalent to our fingering yarn.  This Rowan yarn is much thicker and hence the sweater came out much larger.  I used a size F crochet hook and tweaked the pattern.


This is a photo of the back of the sweater.  Once I had adjusted the pattern so that the sizing would look correct, it was a fun project to crochet.

I have had this pattern for years and years.  My dear Mother's friend gave it to me like 37 years ago.  It was in her pattern collection.  When I googled the pattern, I found that it is online and there's also a you tube video showing the same problem I had with the sizing.


So, here's how I tweaked the pattern:
Row:
 1.  I cast on 72 stitches but I only had 3 dc between each 3 dc cluster stitches (instead of 4) so that the neck opening would not be too large. (Note:  check and make sure you have a total of 14 3 dc clusters at the end of row 1)  When I completed the first couple of rows, I unraveled the unused chain stitches from the original 72 chain.
2.   Same as written
3.   Same as written.
4.   Same as written.
5.   Same as written .
6.   Same as written.
7.   Same as written.
8.   Same as written.
9.   Separate for sleeves (use separation instructions as listed in Row 11 but keep stitch count/instructions as for row 9)
10. Repeat row 9
11.  Do row 10
12.  Do row 11
13.  Repeat row 11
14.  Do row 12
15.  Do row 13
16.  Repeat row 13
17.  Repeat row 13 (This is the last row for the body of the sweater)

When I worked the  edge "trimming" for the bottom and the sleeves, I made the single crochet through the back loops so that it will  match the pattern ridges of the body.

Remember, this is the guage I worked out using a size F hook and the cotton yarn described above.  If you use fingering weight yarn and a size #3 hook as shown in the pattern, you may not need to do any adjustment.

Here is  the pattern I found online.  It's identical to my pattern.

I hope that you will give this pattern a try.  It was really fun once I got the guage straightened out.  And, you can make the sleeves short or long, depending upon your taste.

Please remember to stop by Handmade Harbour and see what lovely ideas my blog friends have been creating.

Wishing you all a wonderful, blessed week,
Pat :)


Sunday, July 7, 2013

Bob's Red Mill 10 Grain Rolls

Greetings!  I hope that everyone had a joyous 4th of July and if you traveled, you are home safe.   I thought I would have my latest crochet project completed and I could share it with you but that didn't happen.  So instead, here is a repost for my 10 grain roll recipe.  I hope you enjoy making them as much as I do.

In the meantime, I will continue to work on my project and have it ready to share with you next week.  Have a great week!

P.S.  Please remember to stop by Handmade Harbour and see some wonderful creative ideas!

*************************************************************************

Here's the recipe I came up with today.  I got the original inspiration from a recipe I found on the internet.  I tweeked it a bit and it turned out great.

Here is my Recipe for Bob's Red Mill 10 Grain Rolls

In small bowl, mix 1 cup of the 10 grain hot cereal with 1 cup boiling water.  Let sit.

In  a large bowl add:

1 cup lukewarm green tea
1 pkg dry yeast
1 T. brown sugar

Mix and let sit for about 5 minutes.  Then add in:

soaked 10 grain cereal
3 T. olive oil
2 T. brown sugar
1 tsp. salt
1 egg
3 1/4 white flour (may need to add more as needed)

Mix well.  I used my mixer with the bread attachment to mix this dough.  It will be sticky.  So, if you are mixing by hand and kneading by hand, make sure the dough is not too stiff but remains sticky.  This is important so that the crumb of the rolls will be moist.

After mixing, cover bowl with plastic wrap and let it rise for 1 hour.  After 1 hour, punch down dough and divide into 18 pieces.  Shape each piece into a ball and place in a greased pan.  I used two round pans and  put 7 rolls into each round pan. (the other 3 rolls got baked by themselves!)  Let rise about 30 to 40 minutes.

Preheat oven to 365 degrees and place rolls in middle rack.  Let bake 20 to 25 minutes.  Remove pans from oven and remove rolls from pan and let cool on metal rack.


These are delicious spread with a little butter.  They would also make a nice addition to the Thanksgiving table.  I hope you enjoy them as much as I enjoyed making them.