Tuesday, December 30, 2014

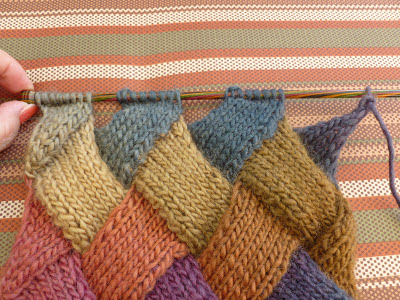
ENTRELAC TUTORIAL and HAPPY NEW YEAR WISHES

Happy New Year my dear friends.  I say "dear friends" as I really feel as though I know all the wonderful people I have met via blog world.  I originally wrote this entrelac tutorial back in 2013 but if you want to challenge yourself to learn something new for the New Year, then here's a tutorial on how to knit "entrelac" style.

Originally my sister-in-law showed me how to do this pattern.  But, with graphs and basic knitting skills, I hope my poorly written tutorial will be of help.  Believe me, once you start, it is a very easy pattern to continue with.  You are basically doing short rows of knitting then adding stitches back on your needle.

If you google "entrelac scarf pattern" there's a few patterns out there but this pattern seems to be a good one for a beginner.  You will need a pair of size 8 or 9 knitting needles and yarn that changes color such as Noro Silk Garden or Crystal Palace Mochi Plus.  If you you these yarns mentioned, it would take 3 to 4 skeins, depending on how long you wish the scarf to be.  I have also used King Cole Twist Aran (two skeins) and Universal Yarn Classic Shades (two skeins).  The yarn you chose is important since  it's the color change in the yarn that makes the entrelac pattern so distinct.


BASE TRIANGLES:
You will begin by casting on 24 stitches.  This first group of "triangles" will be for the base of the scarf; hence "base triangles".  You will have three base triangles after completing this first part:

These triangles will be on your needle so they won't really look like they do above in the diagram but if you were to take them off the needle, this is how they would look.


TIER 1:
Now you are going to knit a #1 left triangle, #2 middle triangle, #3 middle triangle and #4 right triangle. After completing the #4 right triangle you will have 25 stitches on your needle (right triangle #4 has 1 stitch only). These four triangles make up TIER 1.


TIER 2:
Tier 2 consists of #5 triangle, #6 triangle and #7 triangle. All three of these triangles in TIER 2 are made the exact same way. At the end of TIER 2 there will be 24 stitches on your needles.

So, if you look at the diagram above you can see the 3 base triangles followed by Tier l triangles followed by Tier 2 triangles.  The arrows represent the direction of how each tier is knitted.

You will knit the BASE triangles only ONCE.  You will repeat TIER 1 and TIER 2 throughout the pattern (hence you will be making #1 triangle, #2 triangle, #3 triangle, #4 triangle, #5 triangle, #6 triangle, #7 triangle and then back to repeating #1 triangle, etc.)

When you are almost done with your yarn or have knitted to the length you wish, you will complete the FINAL TIER TRIANGLES as shown in the pattern.


 This photo above shows TIER 1 stitches after being completed.  Do you see the one single stitch in the very right end of the needle?  This stitch will count as stitch #1 when you go to pick up 7 more stitches for the start of TIER 2.


This photo shows the beginning of  #5 triangle of TIER 2.  It was #4 right triangle with one stitch and then I picked up 7 more stitches to begin #5 triangle of TIER 2.


 This photo shows the SSK (slip, slip,knit) of row 3 of TIER 2.


This photo shows #5 triangle of TIER 2 completed.  There are still two more triangles #6 & #7) on this tier that need to be completed.  


This photo shows TIER 2 after completion.  You will now go back and start TIER 1 again.

I suggest that you print out the pattern and begin following the directions.  I hope that the diagrams can guide you as to how the pattern comes together.  The diagrams helped me so that I could gauge where I was in the pattern repeats.   It's really a fun pattern to knit and it goes quite fast.


Please excuse my poor diagrams and photos but I did want to share this with you while it was still fresh in my memory!!  (hahaha) .....UPDATE:  I went to edit this post and everything went wrong....I had to redo the diagrams and luckily I had the same photos. 

I hope you enjoy trying out entrelac knitting and please stop by Handmade Monday and see lots of great ideas from other bloggers.  I wish you all a great week!


Wishing everyone a very Happy New Year and all the best for 2015,
Pat


Lilly wishes each of you a wonderful nappy New Year!


Friday, December 26, 2014

Knitting Socks and Holiday Happenings

As I'm writing this tonight, the house is so quiet.  After a fun filled two 1/2 days of festivities, everyone has gone back to their places and it's just me and Lilly tonight (rest of the family went to the movies).  My Christmas trees are still up.  Usually I take them down the day after Christmas but this year I think I will let them stay until the new year and enjoy them a bit longer.  They've been up since Thanksgiving weekend!

We had a very nice Christmas.  In our family, the main festivities begin on Christmas eve and continue through Christmas day.  This year we attended Christmas eve church services for the first time in five years!  I grew up going to church but my family never attended on Christmas.  My husband and I started a new tradition years ago and that was to attend Christmas eve services.  I remember one year it had been so cold with snow coming down all day and the wind  blowing.  My parents always celebrated with us and we had eaten our dinner and opened our gifts.  We didn't make it to service that evening.  Until, my daughter and I decided to go to the 11:00 PM candlelight service.  I remember driving in the snow in our small town in Eastern Washington.  The fresh snow under the tires made such a lovely sound and it was so quiet outside with the new snowfall.  We had a big sedan car back then and it did very well in the snow.  The service was beautiful that evening with the moonlight coming through the stained glass windows of the church.  It's a Christmas eve that I'll always remember.

Now, that I live in sunny, warm, southern California, we don't have snow but we do have lighted palm trees!  But, I am thankful that we are together here as a family and can celebrate together too.  It really warmed my heart to attend my daughter and son-in-law's church on Christmas eve.  It was a beautiful, traditional service, like we used to have in the Lutheran Church.  Don't get me wrong, I'm not here to preach my religion, but it is a big part of who I am and since moving to California, I haven't really found a church family like the one I left back in Washington.   Maybe it's because I'm an empty nester or because I live in such a large metropolitan area.  It's different but that's OK.

Speaking of church, each year there are a couple of churches that host a huge New Year's party.  My husband and I have been going the last six years.  One is held at one of the local Orthodox parishes and the other is at a local Catholic parish.  Both of these churches are comprised of  Middle Eastern parishioners so the party comes complete with mezze, (appetizers), main course, dessert, beverages and live Middle Eastern music!  It should be a fun filled evening.

I've been so focused on getting my Christmas schedule in order that I haven't had much time for my knitting or crocheting.  I'm working on a fun crochet project that I will share that with you at a later date.  In the meantime, here is a picture of the socks I'm almost done knitting:

They are for my daughter.  She brought me the yarn and it was Red Heart worsted weight!  Not sock yarn but never fear...I looked online and found a simple quick  pattern * for socks using worsted weight yarn.  I'm not sure how they will wear but we will see....*note...I cast on 40 stitches instead of 44 stitches and it seems to be perfect measurement wise....

 I came across a new blog the other day entitled Winwick Mum .  She mentioned in her blog post about knitting socks and giving them in person to the one she made them for.  I so agree with her.  Socks can be time consuming but they are truly a work of art when made with the finest sock yarn and a beautiful pattern to match.  I love knitting socks but I must admit, that I haven't knitted any for about two years now.

My daughter had brought me some beautiful sock yarn from Germany.  I found a pattern I liked and started knitting.  This one sock went on a couple of vacations with me and even crossed the ocean one or two times.  I finally finished one sock.... only to try it on and see that the pattern had caused the tension with the yarn to be extremely tight and nonwearable.  Now, that one lonely sock sits upstairs in my craft closet all alone.  I need to get motivated again and start a new pair with a different pattern.


Here's a close-up of the herringbone pattern.....

The pattern for these socks was originally published in Interweave Knits, Winter 2008 under the title "Herringbone Rib Socks".  I'm afraid the pattern to me was a pain in the neck since you knit a stitch and then place the stitch back on the left hand needle to pass a stitch over it; thus the herringbone design is made.....

I'm afraid I've rambled on and on tonight.  If you don't hear from me again before the new year, I wish you all a Happy New Year and all the best for 2015.  And, more importantly, thank you so much for visiting Lilly My Cat and also for signing up to follow this blog.

with my best wishes for the New Year,
Pat


Saturday, December 20, 2014

Egyptian Sugar Cookies for Christmas

I wish I could write like I think.  There's lots of blogs that I read and I love the way they are written.  But when it comes time for me to write, it all jumbled.  So, here's what I'm trying to say.....It's almost here....the house is decorated (the trees have been up since November 30th), the cards have been sent, the packages are wrapped and the Christmas baking is done.  I love this time of year and have always looked forward to preparing for the holidays.  In years past, I use to spend hours going through recipe books and seeing what Christmas cookies I would make.  Now, since I've grown older, I have also gotten slower with lots of things.  The problem is I'm a perfectionist and like to do things in a timely manner.....but after all these years I sometimes feel like a clock that been wound too tight.  I have to let go and just take things easy.  It isn't easy to change....I was knitting the other night and found I made a mistake..I unraveled 20 rows to fix it!

Isn't is funny how roles in life can be reversed?  I remember going to my dear parents home with my children and how much fun they used to have at Grandma and Grandpa's house.  My Dad would be watching his favorite TV show and my Mom would be in her house clothes with her slippers on puttering around in her kitchen.  Now it's my daughter who brings my little grandson to our home.  And I feel and act exactly like my Mom and my dear husband is watching his favorite TV show (stock market channel or FOX news!)

 We went to Oliver's Christmas play this past week and he was the angel Gabriel.  He did a great job.  Here's Oliver's pictures from his Christmas program at his school.  He was four years old in the photo on the left and this year's photo is on the right....quite a difference!

This year we ordered a Christmas hamper from Fortnum and Mason.  I absolutely love that store!  I ordered some other items too since the 30 pounds sterling shipping is a bit much....

We're a small family and I know Christmas isn't about gifts, but I feel for my children since they no longer have grandparents.  I come from a small family and Fouad's family is back east, so I try to make this time of year enjoyable for my family.
(my tree looks so bare....Lilly my cat loves to play with the decorations and she knocks them off!)

But, this is the most precious gift we have from this blessed nativity season....

I will leave you with another cookie recipe.  This is a popular cookie in Egypt and all the middle east to serve during the Christmas or Easter holiday.  The original version uses clarified butter which you whip and then add the ingredients.  This particular recipe is from my good friend Nadia.  It's easy to make the comes out great.

Recipe for "Ghorayebeh" or Sugar Cookies
1 cup Crisco (vegetable shortening)
1 cup powdered sugar
1 3/4 cup to 2 cup flour
1 T orange blossom water (or use you can vanilla if you wish)

Mix shortening with sugar and orange blossom water.  Add in flour (add 1 3/4 cups first and save 1/4 cup if needed) and blend until mixture holds together (if dough is a bit dry, you can add a little bit of water).  Take a piece of dough and knead it in your hand and then roll into a rope shape.  Cut and form into "S" shape on ungreased cookie sheet.  Bake at 350 degrees for 12 to 15 minutes until slightly golden.  Let sit on cookie sheet for one minute before placing on cooling rack.

Shape cookies into "S" shape and place on ungreased cookie sheet

Enjoy!

 I wish each of you a blessed Christmas holiday.  I'd love to hear from you.  Please take a minute to comment if you wish.  I hope to write again before the New Year.

Merry Christmas,

Pat


Wednesday, December 17, 2014

Danish Pebernodder - Peppernuts

I'm back again with another Christmas cookie recipe.  This time we are going to Denmark to make one of my family's favorite traditional treats.....

My Grandma Jorgensen was an excellent cook and baker.  She came to America as a new bride when she was 19 years old.  She and my Grandfather settled in Ellensburg, Washington, a farming community that had lots of Danes back then.  Grandma made these pebernodder every year for Christmas.  When she passed away in 1992 I had gathered most of her recipes but this recipe was not included.  It took me a few years of experimenting with different doughs.  This recipe comes the closet to Grandma's recipe.

This dough needs to be mixed and let sit overnight in a cool place.  Don't worry about letting the dough sit at room temperature as there are no eggs in the dough.  The dough will be stiff but it will easily roll out to be cut into small pieces.  So without further delay, here it the recipe.....

3/4 cup dark karo syrup
1/4 molasses
1/4 cup butter
1/2 cup sugar
1/2 teaspoon cardamon
1/4 teaspoon cloves (I left this spice out since I don't like cloves...)
1 teaspoon cinnamon
1/2 teaspoon ginger
1/4 teaspoon mace
1/4 teaspoon black pepper
1/4 teaspoon baking powder
3 1/2 cups flour

In small saucepan, mix karo syrup, molasses, butter and sugar.  Bring to a boil, stirring, over medium heat.  Remove from heat and let cool.

Mix all spices and baking powder together in a small bowl.  In large bowl, place flour and mix in spice mixture until well blended.  Gradually pour in warm syrup mixture and mix with a wooden spoon until blended.  Be careful as the dough may be a bit warm.  Dough should mix up and form a ball but not be too sticky.  Gather dough in ball and place in tightly covered container and let sit on the counter overnight.

Take a piece of dough and roll into a rope shape....

Roll the ropes in flour....

Cut ropes into small pieces.....

Places pieces of peppernuts on a greased cookie sheet...don't let them touch each other.....

Bake in a preheated 350 degree oven for about 15 to 17 minutes until lightly browned...

Remove from cookie sheet and place on a brown paper bag to cool...

There you go - you will now have a large container of Danish pebernodder. But, I must caution you...this cookie is rather hard.  Place one in your mouth and savor the flavor for a minute before you bit into it.  

I wish you each a blessed holiday season.  If you like reading this post, you can sign up to receive updates from my blog.  Just fill in your e-mail address at the right or follow via Bloglovin!

Wish you the very best during this magical time of year,

Pat


Saturday, December 13, 2014

Pat's Christmas Shortbread Cookies

I'm writing today from glorious, sunny, rain drenched southern California.  Yes!  We received our long awaited rain and we had two days of it.  But, sadly some areas in our state suffered horrribly with flooding and landslides.  I feel so so bad for those people.  The sun is shining today and Lilly is so happy to be out and about in the back yard (really no yard since the pool takes up all the space) since she was cooped inside for two days without any gecko hunting!!

I think the Christmas baking bug has hit me and I'm on a roll!  Did you enjoy reading about the recipe for Egyptian  fayesh (tea rusks)?  I love baking my Christmas cookies and each year I make a list and ponder which ones I should make.  There's always favorites like my Danish kleiner which my children love and I always make some Egyptian cookies too.

Here's my easy recipe for shortbread.  You will need the following:

1 cup unsalted butter (slightly room temperature for easy mixing)
1/2 cup granulated sugar
1/4 tsp vanilla powder (or you can use vanilla essence)
2 cups all purpose flour
1/2 cup cornstarch

In a mixing bowl, blend butter with a fork or pastry cutter until softened.  Add in sugar and mix until well blended.  Add in flour and vanilla powder.  At this point I use my hand to mix in all the flour.  Then add the cornstarch.  Blend well (dough should not be sticky but should be soft).

Roll dough out on floured surface about 1/4" thick.  Cut with cookie cutter of your choice and place on ungreased baking sheet.  Prick surface of cookies with fork for a fun design.  Bake in a preheated 350 degree oven for about 15 minutes or until edges become slightly golden brown.  Remove from cookie sheet and let cool on wire rack before packaging.

 Here they are cooling...

And here they are all tucked away safely until the holidays arrive!

I have really enjoyed my watercolor hobby that I even incorporated it into my cookie baking.  Here's a photo of some cookie tin labels I made for my holiday baking:

As you can see, there's still a few cookies left to be made......(stay tuned for next week's Danish pebernodder "peppernuts" recipe)

I hope you enjoy this recipe.  The dough is so easy to work with that it's always a pleasure making these cookies.  I'd love to hear how your holiday baking is getting along.  Feel free to comment!

Many thanks,

Pat


And...don't forget to stop by Handmade Harbour to see some great crafty ideas!


Thursday, December 11, 2014

Egyptian Fayesh - Recipe for Tea Rusks

I enjoy writing my blog and making new friends via this blog.  My daughter Heidi, told me that I should write more personal posts.  I guess I have written what I thought people would like to read; recipes, patterns, crafts ideas.  So, today I'm going down memory lane and share with you some wonderful memories from times past....

As you may know, my husband is a Coptic Christian from Egypt.  I asked him what he would like me to make for the Christmas holidays and he said he wanted "fayesh".  Fayesh is a type of bread from upper Egypt** that is baked and then dried.  A better name for it would be Egyptian tea rusks.  Years ago I got this recipe from my dear friend Vivian (she and her husband had immigrated from Egypt around the same time my husband came).  When I got married back in 1975, Vivian and her husband lived on our same street.  A year later, her sister-in-law and my dear friend Sonia joined our group.  For all those 20+ wonderful years, we used to bake together and share our recipes. 

The matriarch of this group was Vivian's sister-in-law, Zaizaf.  Zaizaf and her family immigrated to America in the mid 1960's.  It was at Zaizaf's sisters home that I met my husband.  Back then there wasn't any deli or gourmet store where you could go  to get your international food stuffs (unless you lived in a big city).  So, Zaizaf learned how to make these things herself.  She made pita bread and homemade feta cheese and on and on.  She would pass on these recipes to Vivian who would pass them onto me.  Zaizaf gave me my first Middle Eastern cookbook back in 1976....

And I think I made every recipe in this book!

My husband and I moved from our small town in 1997  to the suburbs south of Seattle.  Zaizaf lived about 10 minutes from my new home.  I had 13 wonderful years  getting to know her and hear about her younger years growing up in Egypt.  I loved listening to her stories.  And, best of all I got to bake with her during the Christmas and Easter holidays.  I last saw her in 2010 before I moved to California although we spoke often.  She passed away in 2011. 

So here is my recipe for Egyptian Fayesh - Tea Rusks.  It's popular to eat it in warm milk that has sugar added or with a cup of tea.  I make the dough late at night and let it rise in a cool place overnight.  The bread should have a fine texture so there's no much yeast used in the recipe.

1/2 package yeast (use regular active dry - not fast rising)
3 cups lukewarm milk (you can use whole or 2%)
1/2 cup granulated sugar
6 Tablespoons melted butter
1/4 teaspoon tumeric (it gives the dough a lovely yellow color)
1 teaspoon ground mahlab*
Flour - approximately 2 pounds

*Mahlab is a spice made from the seed kernel of the St. Lucie cherry.  It can be found at Middle Eastern/Persian markets either whole seed or ground.  It adds a wonderful flavor and a lovely fragrance to the bread.

(I made my dough in my mixer with dough hook).  In large bowl, add lukewarm milk and tumeric.  Add in yeast and about 1 Tablespoon of the sugar.  Let it sit until yeast dissolves.  Add in mahlab and two to three cups of flour.  Mix and then add in melted butter.  Continue to add flour until mixture forms a ball.  (Dough should not be sticky but it should have a soft consistency).  Knead well until dough is smooth and place in large bowl and cover well and place in a cool area to sit overnight.

 Here's a photo of the dough after rising and punching down

 Grease 4 baking tins with melted butter (be sure to grease the sides, too)

 Divide dough into 4 equal parts and form dough in pans, pressing dough into pan

 Let them rise for one to two hours (see the pan in the upper right - I made little finger rolls)
Brush tops generously with melted butter 

Bake in a 400 degree oven for approximately 20 to 25 minutes until golden brown.  Remove from oven and let cool on cooling rack.

After cooling, cut in slices approximately 3/4" thick

 You can either package the fresh fayesh and put it in the frig or freezer or you can dry them in the oven.  I dry them at 225 degrees for approximately 1 1/2 hours per side.  The dried fayesh keep for a long time in a tightly covered container.

Enjoy with your morning tea!

I hope you have enjoyed this little glimpse into memory lane.  If so, you are most welcome to sign up to follow my blog.  I would love to have you join in.  

Until next time,  happy baking,

Pat

**Note...for those unfamiliar with the term "upper Egypt" it represents the southern portion of Egypt. Since the river Nile runs north down to the sea, hence "upper Egypt" is up river or south.....

I googled "fayesh" on the internet and there was a recipe out there but believe me when I say my recipe is authentic and will give you perfect results! My dear departed Mother-in-law used to bake this bread during the holidays in her "forn" or outdoor clay oven which was on top of the roof of the family home. 


Sunday, December 7, 2014

Crochet Rolled Edging on Attic 24 Coast Blanket!

Hello.  I can't believe how the holidays are here again.  Time goes by so so fast.  Lots has happened since I posted the pumpkin roll recipe from last week.  We were all sitting down to a wonderful Thanksgiving feast at my daughter and son-in-law's home when all of a sudden my husband passed out.  Long story short, the first responders arrived followed by the ambulance and the sheriff department!  He spent Thanksgiving night in the hospital under observance although thankfully all his tests came back fine.  He had what is called a vasovagal episode.  It was so scary to see.  We celebrated Thanksgiving on Saturday and had a wonderful time.  Thank goodness my husband is doing great.

So, here is my completed Coast Ripple Blanket from Attic24.  It was such a delight to make!

I ordered the yarn kit from Wool Warehouse and received it around September 1st.  I can't believe I've been working on this for 3 fun filled months!

I followed the pattern from Attic24 and the color sequence.  But I decided to add my "rolled edging" as I do not like to weave in all those loose yarn ends!

Here's a close up of the rolled edging....

And here's another view.  Basically I did Row One of single crochet all around the blanket.  Then I started Row Two of single crochet, making 3 single crochets in each corner.  Row Three was a repeat of row two.  Row four was single crochet around but do a decrease in each corner by crocheting three together.  Row five was a repeat of row four.  If you have enough yarn left over, you can do Row six, single crochet in each stitch (no decrease, no increase).

Tie the yarn ends together and make sure they are secure.  Clip yarn ends to a length of about 1 1/2".  Turn edging over and with a yarn needle and yarn, stitch edging in place.  When you come to the edge with all the yarn ends, place yarn ends in channel of rolled edging as you are stitching each stitch.  

If my instruction are not clear, you can find an earlier post here with photos and instructions of the rolled edging.

NOTE
**I ordered one extra skein of yarn to do the rolled edging**

Here is the new home for my coast blanket.  It's on my Ikea couch in the family room.  I am keeping my fingers crossed that Lilly my cat doesn't mess it up!

I was a bit hesitant about the colors at first since there's lots of blue.  But I think it compliments my room since my walls are gold with green curtains and the blue highlights the blue water from the pool outside......

I'm going to be lost without working on the blanket.  It was such a fun project to do.  I've pulled out some yarn I bought in Turkey and I'm starting another blanket.....wish me well.

Until next time, have a great week and I'd love to hear from you and know what you've been working on.

Holiday wishes from,
Pat

 &
Lilly, too!

Thursday, December 4, 2014

How to Make an Elf on the Shelf or Scandinavian Nisseman

The holidays are fast approaching and there's still plenty of time to create something fun!  Here's a repost that I originally posted August of last year.  But, it's very Scandinavian and it's very Christmasy.  So, if you haven't seen it before, here's the instructions for making a Scandinavian Nisseman (or Elf on the Shelf!).


Here is what you will need to make one nisseman:

2 pieces of red felt (12" x 10")
1 small piece of blue felt (12" in length)
1 small piece of ivory felt
small amount of ivory or pale yellow yarn
small amount of ribbon
small amount of brown, white and red embroidery thread
small amount of quilt batting
red sewing thread and needle

The first thing you will need to do is to get the pattern.  Please right click on these two images and "save image as" to your computer.  Then you can go back and print the image from where you saved it on your computer. 


Take the pattern and cut out 1 back, 1 front and 1 hat using the red felt.  Cut 1 face using the ivory felt.  Also cut 1 back out of the quilt batting.  I only used half of the thickness of the batting and cut it a little smaller than the body since you don't want the edges of the batting to showing in the seams.

Draw the face pattern on the piece or ivory felt and embroidery the face.  Here's a close up of the face:

After you have embroidered the face, you will need to assemble the Nisseman to sew the seams together.  Place the back piece on a flat surface, place quilt batting on top, place front on top of batting, place face on front of batting, tucking the neck of the face under the front piece, and lastly, place hat on batting and over the forehead of the face.  Pin pieces together.

At this point you can base the pieces together if it's easier for you.  Otherwise, if the pins don't bother you, then you are ready to stitch the Nisseman together using a needle with red sewing thread.

Here's a closeup of how the pieces are placed together prior to sewing the seams.  As you can see, the bottom of the face piece is tucked under the front neck edge.

 
Here's another picture showing the different layers of the felt, batting, and face.  Stitch around the outside of the piece using the red thread.

Please do not stitch across the neck area or across the bottom of the hat.  We need to attached the braids.  Take the yarn and make a 3 yarn braid.  Take the braid and place it across the top of the face.  Tuck a little bit of the braid on each side of the hat.  Here's a close up of what I mean:


With  your red thread,  start at the lower side of of the face and attach the back of the braid to the body.  Continue to stitch across the top of the hat, making sure you pick up a little bit of the braid in each stitch and finish attaching the braid on the other side of the face.  Lastly, stitch across the neck area.  You may have some red stitches showing on either side of the face on the back side - that's OK.  But, please do not have stitches showing through to the other side when you stitch across the top of the face and neck.

Here's another close up of the face and stitching:


You can tie some colored ribbon on each ends of the braid.  And tie the blue felt scarf around the neck.

And, you now have a lovely little Nisseman to decorate your holiday decor.  If you wish, you can tie a ribbon on top of his hat so that you can hang it from your tree.

I hope you have enjoyed this little tutorial.  And, I hope you have enjoyed visiting Lilly My Cat.  If you like,  please sign up to receive future posts and visit again.


With my best wishes,
Pat :)