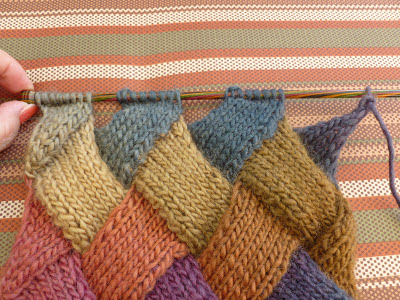
Happy New Year my dear friends. I say "dear friends" as I really feel as though I know all the wonderful people I have met via blog world. I originally wrote this entrelac tutorial back in 2013 but if you want to challenge yourself to learn something new for the New Year, then here's a tutorial on how to knit "entrelac" style.
Originally my sister-in-law showed me how to do this pattern. But, with graphs and basic knitting skills, I hope my poorly written tutorial will be of help. Believe me, once you start, it is a very easy pattern to continue with. You are basically doing short rows of knitting then adding stitches back on your needle.
If you google "entrelac scarf pattern" there's a few patterns out there but this pattern seems to be a good one for a beginner. You will need a pair of size 8 or 9 knitting needles and yarn that changes color such as Noro Silk Garden or Crystal Palace Mochi Plus. If you you these yarns mentioned, it would take 3 to 4 skeins, depending on how long you wish the scarf to be. I have also used King Cole Twist Aran (two skeins) and Universal Yarn Classic Shades (two skeins). The yarn you chose is important since it's the color change in the yarn that makes the entrelac pattern so distinct.
You will begin by casting on 24 stitches. This first group of "triangles" will be for the base of the scarf; hence "base triangles". You will have three base triangles after completing this first part:
These triangles will be on your needle so they won't really look like they do above in the diagram but if you were to take them off the needle, this is how they would look.
TIER 1:
Now you are going to knit a #1 left triangle, #2 middle triangle, #3 middle triangle and #4 right triangle. After completing the #4 right triangle you will have 25 stitches on your needle (right triangle #4 has 1 stitch only). These four triangles make up TIER 1.
TIER 2:
Tier 2 consists of #5 triangle, #6 triangle and #7 triangle. All three of these triangles in TIER 2 are made the exact same way. At the end of TIER 2 there will be 24 stitches on your needles.
Tier 2 consists of #5 triangle, #6 triangle and #7 triangle. All three of these triangles in TIER 2 are made the exact same way. At the end of TIER 2 there will be 24 stitches on your needles.
So, if you look at the diagram above you can see the 3 base triangles followed by Tier l triangles followed by Tier 2 triangles. The arrows represent the direction of how each tier is knitted.
You will knit the BASE triangles only ONCE. You will repeat TIER 1 and TIER 2 throughout the pattern (hence you will be making #1 triangle, #2 triangle, #3 triangle, #4 triangle, #5 triangle, #6 triangle, #7 triangle and then back to repeating #1 triangle, etc.)
When you are almost done with your yarn or have knitted to the length you wish, you will complete the FINAL TIER TRIANGLES as shown in the pattern.
This photo above shows TIER 1 stitches after being completed. Do you see the one single stitch in the very right end of the needle? This stitch will count as stitch #1 when you go to pick up 7 more stitches for the start of TIER 2.
This photo shows the beginning of #5 triangle of TIER 2. It was #4 right triangle with one stitch and then I picked up 7 more stitches to begin #5 triangle of TIER 2.
This photo shows the SSK (slip, slip,knit) of row 3 of TIER 2.
This
photo shows #5 triangle of TIER 2 completed. There are still two
more triangles #6 & #7) on this tier that need to be
completed.
I suggest that you print out the pattern and begin following the directions. I hope that the diagrams can guide you as to how the pattern comes together. The diagrams helped me so that I could gauge where I was in the pattern repeats. It's really a fun pattern to knit and it goes quite fast.
Please excuse my poor diagrams and photos but I did want to share this with you while it was still fresh in my memory!! (hahaha) .....UPDATE: I went to edit this post and everything went wrong....I had to redo the diagrams and luckily I had the same photos.
I hope you enjoy trying out entrelac knitting and please stop by Handmade Monday and see lots of great ideas from other bloggers. I wish you all a great week!
Wishing everyone a very Happy New Year and all the best for 2015,
Pat
Lilly wishes each of you a wonderful nappy New Year!


